skip to main |
skip to sidebar
Imagine this. Your DH takes the two girls camping. For the whole weekend. Without you. Well, that's the boat I find myself in this weekend. They all left last night for an end-of-the-school year campout with the Adventure Princess group they belong to. What to do? What to do? Usually, I clear off the dining room table and spread out all my scrapping supplies and get to work. I think it might be too muggy today for that. 86+ and we haven't unearthed the air conditioner yet. Perhaps I'll head over to the lone surviving LSS in our area... I could clean up the living room and dining room without the fear of a return to chaos by nightfall... I could watch some movies that don't involve talking computer-generated animals or singing, dancing high-schoolers. Oh, the possibilities!
 This is an art journal that I created for the afore-mentioned 28 Days class at Big Picture. I made it all by myself! The book is covered with papers, rub-ons, and diecuts from My Mind's Eye (Tres Jolie and Magnolia collections). The covers and pages are part of the stash that came with my Bind It All machine, which I used to wire-bind the whole shebang. I'll share some of the pages inside once the gang comes home from Lake George with my camera!
For those of you who missed out on the “Beat the Winter Blues” Stamp Camp last weekend, you missed a great day with lots of great prizes and projects. Here are photos of the projects we made. First, a stunning gift box with coordinating card. This presentation will really knock someone’s socks off! The box was created using two of my favorite new products from the Spring Summer Collection — the Embrace Life stamp set and coordinating Ginger Blossom Designer Series Paper.
 Next, we created a bunch of cards, many of them using sets from the Sale-A-Bration promotion. At the end of the day everyone went home with 7 hand-stamped cards and a beautiful gift box (and many people brought home free stamps, embellishments, and hand-made door prizes!). Not a bad take for two-and-a-half hours of work!

 I’m becoming a big fan of online classes, and here’s a new site with lots and lots of offerings, My Creative Classroom. This week is their grand opening, and if you register for their newsletter you can enroll in their free classes this week!
Here are a couple of projects from last month that I neglected to post. The first is a shot of the three cards created in last month’s Stamp A Stack class. The participants created 5 each of the cards, for a total of 15 ready-to-mail Christmas cards!
 The next is the gift I made for all my daughters’ teachers this year. The tin and the stamp set (Holiday Treats) are from Papertrey Ink, and the cardstock, ink, brads, and patterned paper (Wintergreen) are from Stampin’ Up! These were soooo easy to make. Just stamp on standard address labels and wrap them around Hershey’s nuggets candy. Add a stamped greeting, and voila! Instant gift!

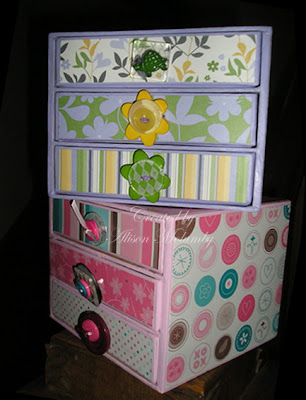 Don’t tell the girls, but these little babies are part of their Christmas presents. Yet another project from Big Picture Scrapbooking’s Giving Well class. I started with chipboard drawers by Maya Road, painted with leftover wall paint (to ensure a perfect match, of course). Then I decoupaged (again with the decoupage) with Stampin’ Up! Designer Series Papers and attached some random buttons with ribbon for drawer pulls. I think they’re adorable — hopefully the girls will too!
 Just what I need — another hobby! I’m just getting started digiscrapping, and I’m finding it’s just as addictive as paper crafting. I just completed this page as a homework assignment for an online lesson.

 This is another cute project from my class. A place to store all the birthdays and special dates in your life, and room for photos too! This measures a little under 4 x 6. Materials used include: Cutie Pie Designer Series Paper, Bliss Blue, Certainly Cerlery, Rose Red, and So Saffron Craft inks, Prints Designer Series Papers, and cardstock, and Two Cute stamp set. Alphabets: Typeset Lower, Alphadots (retired), and Rough Edges Mini.

 I'm in a total decoupaging frenzy around here! I've been covering all kinds of items for Christmas gifts this year (again, influenced a great deal by the class I'm taking at Big Picture Scrapbooking). I don't want to post too many of my projects online in case the future recipient should get a peek at them, but this is one gift I made for myself. (I'm finding that happening a lot this year!) The paper is Cosmo Cricket "Halfway Cafe" that I picked up at my local scrapbook store (AKA "LSS") Memory Lane, which closed its doors a few months ago. I loved the paper, but it didn't seem to lend itself to a scrapbook page. It was perfect for this application tho. The star is a Stampin' Up! chipboard piece, with one of their big eyelets and Maya Road fibers for embellishment.


Are you making your own cards this year? I make mine every year, and it always seemed like I would start somewhere around the 15th of December. Not recommended! This year, I've been taking a class over at Big Picture Scrapbooking called "Giving Well in Two Hours or Less." It’s fantastic! Loads of very reasonably priced and easily produced handmade gift ideas, including the first project, holiday cards. These are the cards we worked on for the class. I’m so proud of myself — I’ve got a good stack of cards finished before the end of November! I think that’s a personal record.
If you’d like to get a start on your handmade holiday cards, I’ll be holding a Stamp-A-Stack card class on Saturday December 8 at 9:30am. You'll be making 15 cards — 5 each of 3 different designs, including envelopes, for $20. Call or email before Monday Dec. 3 to sign up. (The cards in the photos will not be on the menu!)
 This little treat jar used to be a breadcrumb container. A little soap and water, some Stampin’ Up! Designer Series Paper, a few stamps, and Voila! you’ve got a nifty, gifty treat jar! Supplies for this Project: Bitty Boos 2 and Booglie Eyes stamp sets; Basic Black, Whisper White, and Pumpkin Pie cardstock; Basic Black Ink; Stampin’ Write Markers; Prismacolor colored pencils; 3/4", 1", and 1 3/8" circle punches and Scalloped Punch; Coluzzle; and Creepy Crawly Designer Series Paper. Artwork ©1990-2007 Stampin’ Up!

 Several people have asked about the DeVa Bag class next Saturday... that was when I realized that I forgot to publish the photos of the project! Sorry about that! This project includes 14 little "Love Notes" (3 x 3 note cards) with a matching designer bag to carry them in. The notes are too small to mail, but they make great gift tags or enclosures, or you can adhere one to a full-size card front for mailing. The notes and bag would also make a great gift for someone else! The name "DeVa" is not misspelled! It’s named for my friend and upline Deb Valder, who introduced the project to our stamp group last month. If you’d like to join in the fun, please RSVP by Tuesday, September 18. This class will be held on Saturday September 22 at 9:30, and is $15. Please bring a 12-inch paper trimmer if you have one, scissors and your favorite adhesive. I'll have glue sticks available.
For the first time, I’m offering this as a “Class in a Bag.” If you can’t make it to the class, I will give you all the materials along with an instruction sheet for putting it all together, and you can make it all up at home! I can provide the project pre-stamped for you as well. To order online, send your orders via my PayPal account (alimo@nycap.rr.com). Otherwise, call or drop me an email and we can arrange for a COD pick-up. Add $5 for postage if you’d like it mailed, otherwise orders will be ready at my house on an as-received basis. Let me know at that time if you’d like your cards pre-stamped.
Due to time and supply constraints I cannot take orders for specific Designer Series papers. All cards will be white or vanilla cardstock and will come with one pattern of double-sided paper. Ribbon may be substituted for rhinestone brads based on availability. This offer is only good through Monday, September 24, 2007.
 It’s July, and that can only mean one thing... Stampin Up! has released their new catalog and the money is flying out of my wallet! The new book is just jammed with absolutely gorgeous new stamp sets, patterned papers, and sparkly accessories. Here’s a card with one of my new favorite sets, Baroque Motifs. Check out the rhinestone brad! This card also features two of the "In Colors" for 2007-08 — Wild Wasabi and Groovy Guava.
 Almost forgot, this blog is supposed to be all about stamping, isn’t it? Thought I'd better share a card with you, since that’s why I invited y’all over! Yet another card with one of my favorite retiring sets, Natural Beauty. The focal point was created by watercoloring the stamped image, then coating it with 3-4 layers of Glassy Glaze embossing powder. I put it in the freezer for a little bit, removed it, then bent the cardstock to get that cracked glass effect.
 Does one ever get “caught up” on their scrapbooking? Time just keeps forging ahead, and so do all those memories that we want to capture in our scrapbooks. I’ve got boxes, drawers, envelopes, and photo albums bursting with pictures that need to be scrapped. Where do you start? I’ve read that you shouldn’t bother trying to scrapbook chronologically, you should just dive in wherever you are in life. It feels so random, but, hey, at least I’m getting something done! This layout jumped out at me from the May issue of Simple Scrapbooks; a page by one of my favorite scrapbook artists, the wonderful and inspiring Cathy Zielske. How do you choose just one photo to feature on a page? Well, you just dig in. I literally dug through one of my many junque (that just looks so much more meaningful than “junk,” doesn’t it?) drawers and pulled out this 5 x 7 of Niamh. It turned out to be a perfect fit with the layout.
This layout uses all Stampin’ Up! materials: Gable Green, Only Orange, Whisper White cardstock; Pixie Pink ink; Dots & Dashes Designer Series Papers; Polka Dots & Paisleys set; Rough Edges and Typeset alphabet stamps; On Board Accents chipboard slide frame; Bold Brights Eyelets; and the Write Me A Memory Vol. 1 font CD (Casual font). The journaling was printed on white cardstock, then Gable Green ink was rolled on using the sponge attachment for my brayer.
 I am totally in love with this new Stampin’ Up! double-sided paper Petals & Paisleys! The colors are so bright and cheerful (and I must say that this photo and the pictures in the mini catalog do not do it justice — you really must see it up close and in person!). I created all these projects from just three sheets of the patterned paper. If you’d like to do the same thing, comment here or drop me an email and I’ll schedule a class.
It’s getting late... Sell-A-Bration and the Stampin’ Up! Winter Mini will be history in only one week! Thought I’d share some more samples from these two great mini catalogs. If you like what you see, now is the time to get an order in! This card was created with the “Something Punny” set, and I used the spots from “Fun Filled.” I also used lots of fun accessories — Soft Subtles Mini Brads, the Tag Punch, Flirty Ribbon and Loves Me Double-Sided paper. I LOVE the colors in the paper, they're so fun and candy-dish bright, and they coordinate sooooo well with the Flirty ribbons.
 Sorry about the slightly blurry photo, but I think you can see all the lovely details. This card was created using the absolutely gorgeous Carte Postale line of products from the Winter mini. The stamp set is Carte Postale, and the background stamped in Craft White is the French Flair stamp. The striped paper is from the Enchanté double-sided paper collection, and it’s embellished with a couple of Vintage Brads.
 This little 6 x 6 page features the Loves Me paper again, and some of the super-adorable die-cuts from the Accents and Elements tin (also in the Winter Mini). I love that all the accents coordinate with both the Loves Me and Enchanté collections, and once they’re used up I'll be able to “alter” the tin that they came in. Stay tuned here for that project to make its debut!
 The last sample I’ve got today features a brand-new product from the upcoming Spring Mini catalog. Stampin’ Up! is introducing a line of office-themed products that all coordinate as only SU! products can, and the “Thanks” tab was created using the Round Tab punch. There’s also a Spiral Punch that mimics spiral-bound paper, plus a great March special. Visit the Stampin’ Up! website for details on that!
 Here’s a cute card using the Very Punny Sell-A-Bration set. Change out the pink and the baby card will work for a boy as well!
 This one uses the very elegant Carte Postale set from the Winter Mini. This set also has a coordinating wheel, background stamp and the most gorgeous double-sided paper. You still have a couple of weeks left to take advantage of Sell-A-Bration AND the Winter Mini!! Once February ends, both catalogs are gone. Drop me a line to place your order before it’s too late! Artwork ©1990-2007 Stampin’ Up!
these Sell-A-Bration sets are! Here are some samples using the sets so you can see them "in action!" (The pretty teal and celery flowered card was stamped by me, but designed by one of my stampin' buddies in our NY Inketts stamp group.)


